

Nesting is a powerful feature in Adobe Premiere Pro that helps organize complex projects and apply effects to groups of clips at once. But what if you need to "unnest" your sequence and regain access to each individual clip? This guide will show you exactly how to unnest clips in Premiere Pro, plus best practices and common mistakes to avoid.
What Nesting Means in Premiere Pro
Nesting in Premiere Pro lets you combine multiple clips into a single sequence, known as a "nested sequence." This is especially useful for:
- Applying effects or transitions to a group of clips together
- Keeping your timeline organized and less cluttered
- Streamlining edits on complex projects
When you nest clips, they appear as one green block on your timeline. You can double-click to open and edit the nested sequence, but sometimes you need the original clips back in your main timeline for more granular edits. That’s when unnesting becomes crucial.
Video Unnest Tutorial
How to "Unnest" a Sequence Step-by-Step
Unlike traditional “ungroup” commands, there’s no one-click “unnest” button in Premiere Pro. But you can easily reveal and recover your original clips with this quick fix:
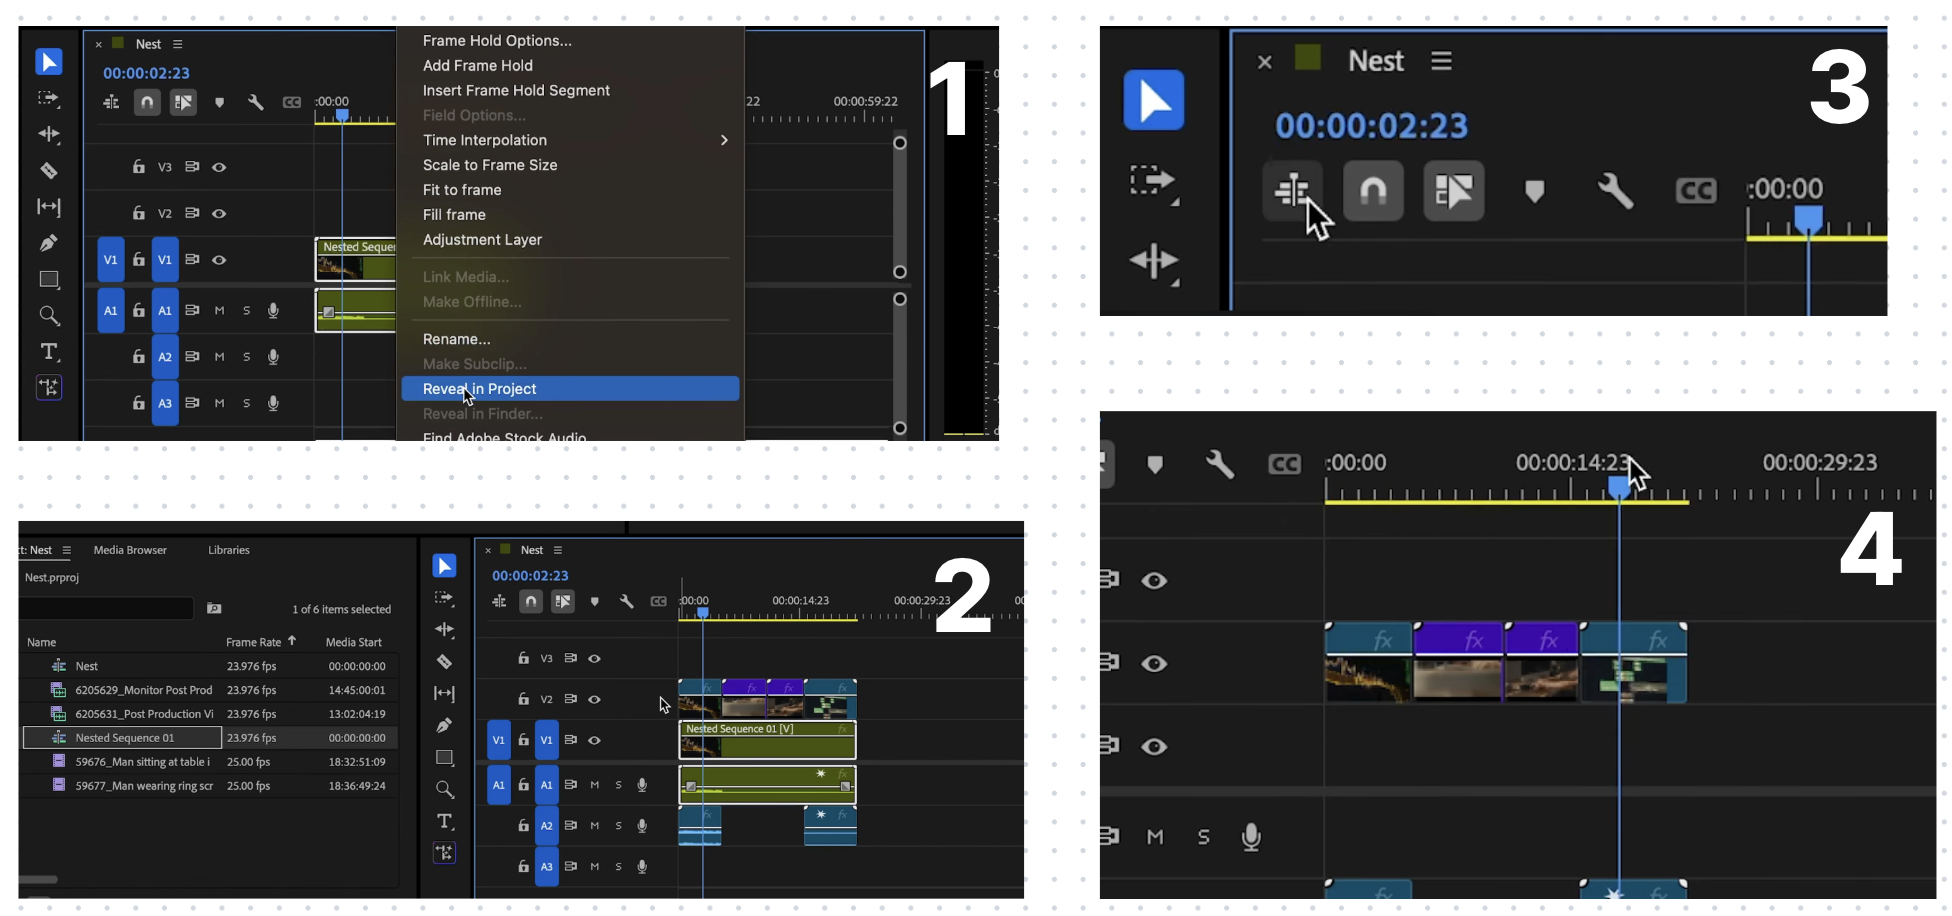
- Find the Nested Sequence:
On your timeline, locate the nested sequence you want to unnest. Click to highlight it. - Reveal in Project Panel:
Right-click on the nested sequence. In the menu, scroll down to Reveal in Project and click it. - Check the Sequence Button:
In your project/media panel, make sure the sequence button (it looks like a little timeline icon) is unchecked/disabled. This ensures you’ll be able to see and drag the sequence as individual clips. - Drag Nested Sequence to Timeline:
In the media/project panel, find your nested sequence. Click and drag it on top of your existing nest on the timeline. - Clips Are Now Unnested:
You’ll see that all the individual clips from the nested sequence now appear on your main timeline, replacing the old nested block. - Clean Up:
You can now safely delete the old nested sequence block. Your timeline will show the original, editable clips—ready for detailed adjustments or effects.
You can always nest these clips again if needed—unnesting is 100% reversible.
Best Practices When Dealing with Nested Footage
- Use Nesting for Major Edits:
Nest clips when you want to apply effects, transitions, or changes to a group as a whole. This keeps your timeline tidy and efficient. - Label Your Nests:
Give your nested sequences clear names in the Project panel. This makes it easier to manage and locate them, especially on large projects. - Backup Before Unnesting:
Duplicate your sequence or project before unnesting, in case you want to revert to the nested version later. - Be Aware of Sequence Settings:
Double-check the frame rate, resolution, and aspect ratio of nested sequences—these can affect how your clips behave once unnested.
If you want to systemize your workflow even further, you can also build reusable project structures by learning how to make a Premiere Pro template.
If you're still learning the basics and want to progress faster, here’s a complete guide on how to learn Premiere Pro for free.
Common Mistakes to Avoid
- Deleting Nests Too Soon:
Don’t delete your original nested sequence before making sure all the clips have transferred correctly back to the timeline. - Not Disabling the Sequence Button:
If the sequence/timeline button is enabled in your Project panel, you might not be able to drag the clips as expected. Always double-check that it’s off. - Forgetting to Save:
Big timeline changes? Save your project or create a duplicate before unnesting, just in case you need to undo. - Losing Effects and Transitions:
Some effects or transitions applied to the nested sequence may not automatically transfer to the unnested clips. Double-check your timeline and reapply effects if necessary.
Conclusion
Unnesting clips in Premiere Pro is quick and easy once you know the steps. Whether you’re making micro-adjustments or reorganizing your timeline, this technique gives you maximum editing flexibility. Remember to follow best practices to keep your project organized, and always back up before major changes.
Want to become a Premiere Pro expert?
Check out the Premiere Pro Course by Miracamp for in-depth tutorials, advanced workflows, and step-by-step lessons designed to turn beginners into professional video editors. Join a community of creatives, learn directly from industry experts, and unlock your full editing potential!
Frequently Asked Questions
What does nesting do in Premiere Pro?
Nesting combines several clips or sequences into a single block on your timeline. This allows you to apply effects, transitions, or adjustments to multiple clips at once, keeping your timeline organized and simplifying complex edits.
Is there a single "unnest" button in Premiere Pro?
No, Premiere Pro doesn’t have a direct “unnest” command. However, you can easily unnest by revealing the nested sequence in your Project panel and dragging its individual clips back onto your timeline as described above.
Will I lose my effects or transitions when I unnest a sequence?
Any effects or transitions applied directly to the nested sequence block will not automatically transfer to the individual clips after unnesting. Double-check your timeline and reapply any effects or transitions as needed.
Can I nest and unnest as many times as I want?
Yes! Nesting and unnesting are reversible. You can always nest a group of clips, unnest them for further edits, and nest them again if it helps your workflow.
What’s the best way to keep my project organized when using nests?
Always label your nested sequences clearly, and consider creating duplicate timelines before major changes. This way, you can easily revert to a previous state and keep your project clean and efficient.


