In this guide, you’ll learn how to insert an image in DaVinci Resolve using the Edit Page and Fusion Page, how to resize, reposition, and animate your image, and how to handle alpha transparency (PNG) and image sequences.
Method 1: Insert an Image in the Edit Page (Drag & Drop)
This is the fastest and most common method.
Step-by-step:
- Go to the Media Pool (Edit Page)
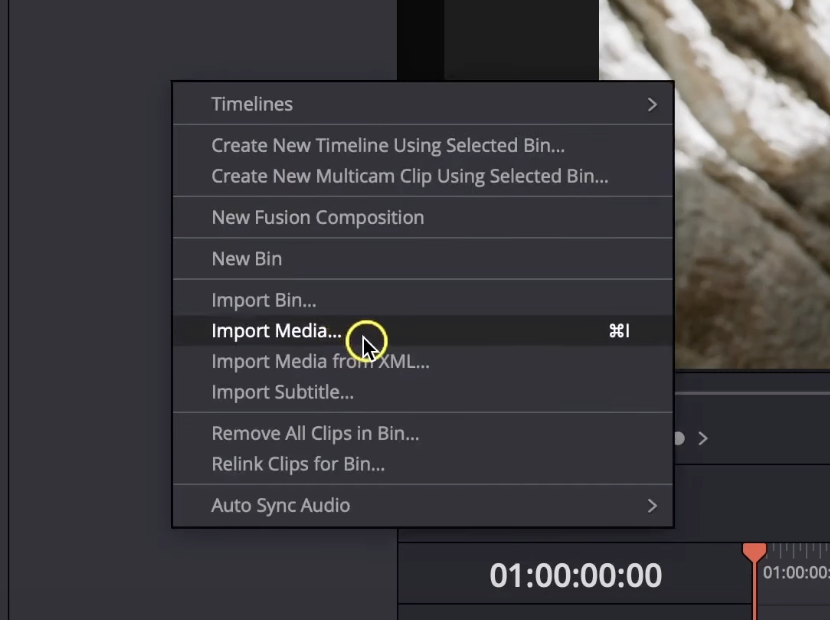
- Right-click > Import Media, then select your image (
.png,.jpg,.webp,.tiff) - Drag the image from the Media Pool onto the timeline
- Place it on a video track above your main footage (e.g., V2, V3)
- Resize or reposition it in the Inspector (top-right)
💡 PNG files with transparency (alpha channel) will display correctly over your video.
Adjusting Image Size and Position
Once your image is in the timeline:
- Select the image clip
- Go to the Inspector > Transform section
- Change:
- Zoom to resize
- Position X/Y to move
- Rotation Angle for tilt
- Opacity for transparency
You can also apply fade in/out transitions by dragging handles at the start/end of the clip.
Method 2: Insert an Image in Fusion (For Motion Graphics)
For animation, motion tracking, or compositing, use the Fusion Page.
How to do it:
- Select your video clip in the timeline
- Click Fusion at the bottom of Resolve
- In the Node Editor:
- Press
Shift + Space→ Search for “Image” or “Loader” - Add a Loader node (Fusion calls external files "loaders")
- Connect it to a Merge node, then to MediaOut
- Adjust size with a Transform node
- Press
🔁 This method allows for animation, masking, tracking, and layering with full control.
Importing Multiple Images (Slideshows & Sequences)
Want to insert several images at once (for a slideshow, carousel, or storyboard)?
Step-by-step:
- Go to Media Pool > Import Media
- Select multiple images (Shift + Click)
- Resolve will ask if you want to import as an image sequence
- Click “No” if you want individual stills
- Drag them into the timeline and adjust duration, order, or add transitions
📸 Ideal for product shots, client reviews, or photo montages.
Method 3: Use Image as Background or Full-Screen Graphic
If your image is intended to fill the entire screen (e.g. a background or a slide):
- Import the image
- Drag it to V1 (base track)
- Adjust its Zoom to fill the frame (in Inspector)
- Optionally overlay text or icons on V2+
🧠 You can even create entire video sequences from static images using Ken Burns-style animations.
If you want to place titles or captions over your image background, you can easily add them using Resolve’s built-in tools. See our step-by-step tutorial on how to add text in DaVinci Resolve.
Method 4: Add a Logo or Watermark (Permanent Placement)
To keep a logo visible throughout your video:
- Import your logo (ideally a .PNG with transparency)
- Place it on V3 or higher to keep it above all layers
- Resize + reposition to bottom corner (e.g. Position X: 0.8 / Y: -0.8)
- Right-click the clip > Change Clip Duration to match the full timeline
- Lower Opacity in the Inspector if needed
If you're creating fun overlays or adding graphic elements like icons and stickers, you can also insert emojis directly into your titles. Learn how with our guide on how to add emojis on text in DaVinci Resolve.
Supported Image Formats in DaVinci Resolve
🎯 Tip: Use PNG or WebP for best quality + transparency.
Master Visual Storytelling in DaVinci Resolve
Inserting images is just the start. If you want to learn how to animate them, use them in intros, overlays, motion design, or titles—our full training covers all of it.
👉 Start your learning journey with our DaVinci Resolve Course.
FAQ Inserting Images in DaVinci Resolve
Why is my image zoomed in too far?
Your image might have a very high resolution. Just reduce the Zoom level in the Inspector > Transform tab.
How do I fade an image in and out?
Select the image in the timeline → Hover over the top-left or top-right corner of the clip → Drag the fade handle inward to create a dissolve.
Can I animate the image (scale, move, etc.)?
Yes. Use the keyframes in the Inspector to animate Zoom, Position, Rotation, or use Fusion for advanced animation paths.
Can I insert an image sequence as a video?
Yes. When importing, Resolve will detect numbered files (image001.png, image002.png...) and ask if you want to import as a sequence. Choose “Yes” to treat them as a video clip.
Why is my transparent PNG showing a black background?
Make sure you’ve placed the PNG above a video or solid layer. If it's still black, check that alpha channel is preserved in the file.